What's New in Consultation Manager?
Vision 3 Release DLM 830
Vision 3 release DLM 830 contains the following new features and improvements for Consultation Manager:
General
-
Spell Checker (Available for Hosted practices with Windows 10 and Windows Server 2012 or later only) - A spell checker has been added to all data entry forms within Consultation Manager, it uses the standard Windows dictionary combined with a medical lexicon based on SNOMED CT terms. Words that are not recognised are underlined with a red wavy line. To see suggestions for the word you have entered, right click on the incorrect word and a list of alternatives displays, select as required, or you can simply manually correct the word.
Note - An unrecognised spelling does not prevent you from saving an entry. -
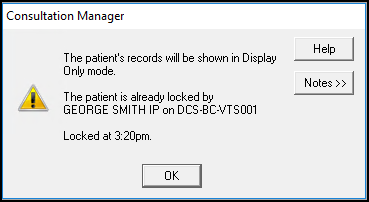
Lock/Unlock Patient - When you attempt to open a consultation for patient that is already in use by another member of staff, the Display Only message now contains details of the member of staff with the patient record open. Select OK to dismiss the message open the patient in Display Mode:
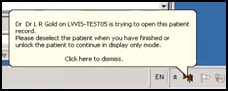
The member of staff with the record open, receives a notification that you are trying to open the record to prompt them to release the patient record as soon as they are able:
To unlock the patient you can, select Consultation - Unlock the Patient. This closes any consultation you have open leaving the record on your screen in Display Only mode.
If you have a patient displaying on your screen in Display Mode, and no-one else has locked the patient, you can select Consultation - Lock the patient to open a consultation.
-
Alerts - If a patient has unverified contact details, a new Contact Verification Required alert displays:

To mark a contact type as verified, simply double click the alert to display the Patient Details screen, highlight the contact information that is not verified, select Edit, tick Verified and select OK.
Prescribing
-
Drug Warnings - To comply with best practice, the warning message that displays when prescribing medication that contains Valproate to female patients has been extended to include all females in the 12 - 55 years age bracket.
-
Treatment Days - The values entered in both Quantity and Dosage are now used to calculate the number of treatment days. For Controlled Drugs, when you select OK, if the number of days exceeds 30, a warning displays. Select OK to continue.
-
Private Prescriptions - When you add a therapy item as Private, [PRIVATE PRESCRIPTION] now prints after the medication details on the right hand side and private items print on a separate script.
England Only
-
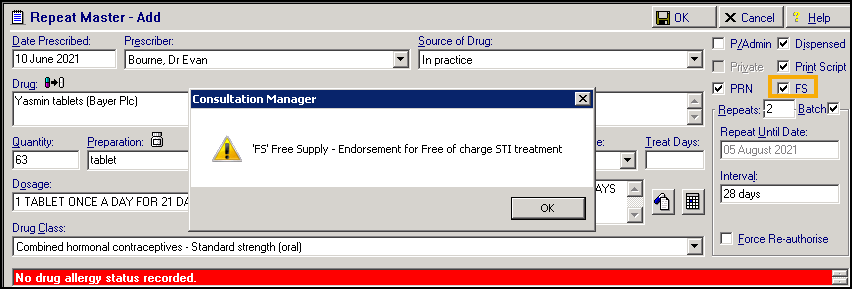
Free Supply Endorsement - To indicate an item is being prescribed as a sexual health treatment of a Sexually transmitted infection (STI) and should therefore be issued free of charge, there is a new FS option.
To mark an item as Free of charge STI treatment, tick FS. A reminder re the use of the Free Supply Endorsement displays. Select OK to close the reminder and continue if appropriate:
On a paper prescription, FS prints after the item name.
On an electronic prescription, FS displays in the endorsement column.
Scotland Only
-
Formulary Management Tool (FMT) - The Cegedim Healthcare SolutionsFormulary Management Tool (FMT) is now fully integrated with Vision 3 allowing you to utilise multiple formularies, including those issued and maintained by your Health Board, across your practice.
See Cegedim Healthcare Solutions Formulary Management Tool for details.
-
Instalment Dispensing - A new Therapy Plan screen is available when you select Instalment dispensing
 from Therapy - Add. For acute issues, you can now define dosage regimes from the Therapy Plan screen.Note - Vision 3 release DLM 830 does not affect existing instalment instructions, these can however be updated when you reauthorise next.See Instalment Dispensing for details.
-
-
The following details now display on any prescription authorised by a member of staff classified as a Non-Medical Prescriber:
-
Prescriber Number
-
Staff Role
-
Authorisers Name
-
Practice Details
-
Professional Registration Number
These are all set up in Management Tools - Control Panel - Staff, see Adding Staff in the Management Tools Help Centre for details.
-
-
Prescriber Capacity/Capacity - This option displays, on both the therapy - Add and the Prescription Manager screens, if you are a non-medical prescriber with both Independent and Supplementary prescriber settings, select under which prescriber capacity you are prescribing.
-
-
Drug Check - For prescribing safety, you can no longer suppress the drug-condition contraindication or any precautions. If you have selected Never in your settings, this is updated to Patient Specific as part of the DLM 830 update.
-
SCI Gateway - The following updates are included this release:
-
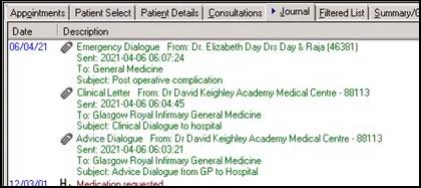
Two new types of New Message are available from SCI Gateway, both of which write back to the patient's record, with all the associated information in Consultation Manager when saved:
-
Advice Dialogue
-
Emergency Dialogue
-
-
When you open SCI Gateway and check incoming messages, if a response to a message you have sent is received, when you select Save to File, the message is now added to the original message in Consultation Manager creating an easy to follow message trail:
If a message fails to write back to the patient record, a warning displays and the message can be manually attached through Docman.
Important - SCI Gateway does not prompt you if you are not responding to the latest message in a trail, so ensure you check there are not later messages.Remember - For help with using SCI Gateway, you can select Help from the bottom left corner of the SCI Gateway screen. -
-
Key Information Summary (KIS) Special Note - Clinical term 9bK5.00 Special patient note, is now updated to include the entry with the latest Event Date in the ECS/KIS extract.
-
Alerts - You are no long warned if a patient does not have a valid NHS Number.
Previous Releases
Vision 3 release DLM 820 contains the following new features and improvements for Consultation Manager:
-
Drug Checks:
-
Drug Doubling - You can now differentiate Duplication offset dates from your Contraindication, Interaction and Precaution offset dates. From Consultation Manager, select Consultation - Options - Setup - Drug Check, under Therapy Data for Drug Checks and New Sensitivity Checks, there are now two date offset options:
-
From Last (date offset) - Defaults to 1 year, update as required.
-
Duplicate (date offset) - Defaults to 3 months, update as required.
Note - In England, Wales and Northern Ireland, these cannot be less than 7 days, in Scotland they cannot be less than 30 days, if you try to update less than your country minimum, an error message displays.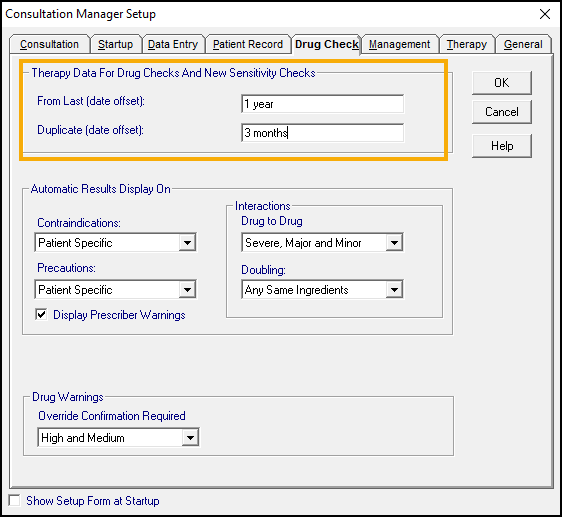
-
-
-
Prescribing:
-
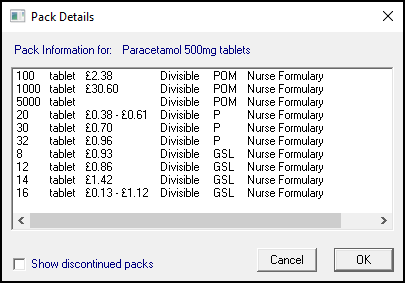
Pack DetailsOrder- When you select Pack Details
 from a Therapy screen, the display order is now:
-
Prescription Only Medication (POM) - Smallest pack size first.
-
Pharmacy can prescribe (P) - Smallest pack size first.
-
General Sales (GSL) - Smallest pack size first:
-
-
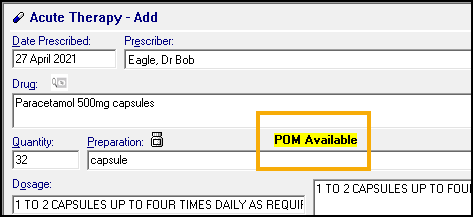
Prescription Only Medicine Warning- If there is a Prescription Only Medicine (POM) version of a selected P/GSL product, to ensure cost-effective prescribing, POMAvailable displays above Preparation:
If you select a POM but select a quantity that does not match a POM pack size, the following warning displays:
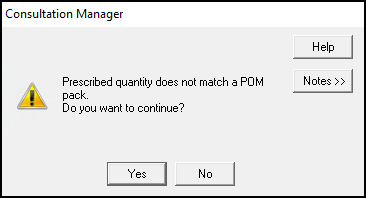
Select Yes to continue or No to reselect the pack size.
-
Unlicensed Medicines Warning- If you select an unlicensed medicine from a Therapy - Add screen, an Unlicensed warning displays:
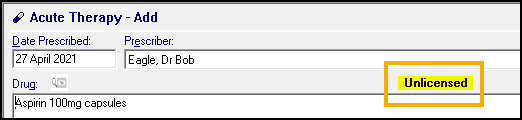
This warning also displays in the Drug information section of the Select Drug screen:

This includes items with:
-
No Licensing Authority.
-
Unknown Licensing Authority.
-
No Licensed Actual Medical Product (AMP).
-
-
Medication Reviews:
-
Individual Item Reviews- You can now set a reminder to review individual medication from any Therapy - Add screen.
See Adding a Medication Reviews for details. -
Patient Presence - The Medication Review screen has been updated to include a Patient Presence option. Select from the available list as appropriate:
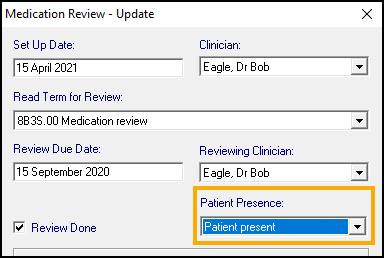
Patient Presence defaults to None, but if you select 8B3x.00 Medication review with patient, or 8B3h.00 Medication review without patient in Read Term for Review it automatically updates.
-
Medication Review Due/Overdue- The symbol alongside a due or overdue Medication Review has been updated:
-
Medication Review Due - The date indicator displays in yellow
 .
. -
Medication Review Overdue - The date indicator displays in red
 .
.
-
-
-
Creating an Acute prescription from a Repeat - The Floating Drop Target has been updated to recognise the type of prescription issue you are dropping on to Prescription
 . You can now drag and drop the following:
-
Repeat issue, to create a one off acute prescription retaining the same details as the repeat issue you are copying, or
-
Acute issue, to create a repeat master retaining the same details as the repeat issue you are copying:
-
-
Deleting/Cancelling Repeat Issues- If appropriate, you can now delete or cancel any issue of a repeat master. If the issue selected is not the latest, a message displays to warn you, simply Yes to continue and the Cancel Prescription Reason screen displays in the usual way. If the issue selected is the latest, it is removed from the list, if it is not the latest, it displays as cancelled:
 Note - If this is an electronic prescription, you are warned that the cancellation is transmitted automatically.Training Tip - For more details on deleting issued medication, see Deleting a Repeat Issue for details.
 - Printed Prescriptions- Your financially responsible organisation now prints on prescriptions to ensure prescribing costs are passed on to the appropriate organisation.
-
Source of Drug - There are two new out of practice entries available to select from the Source of Drug list:
-
By Pharmacy.
-
By Federation.
-
-
Record medication issued by other organisations: - When you add a medication and select Source of Drug as outside the practice:
You have two new options:
-
Prescriber - This becomes a free text option to record the prescriber of the medication if required. A list is created as you use this option.
-
Organisation - This is a free text option to record the organisation of the prescriber if required. A list is created as you use this option:
 Remember - You cannot issue against a Repeat Master prescribed by an outside source.
-
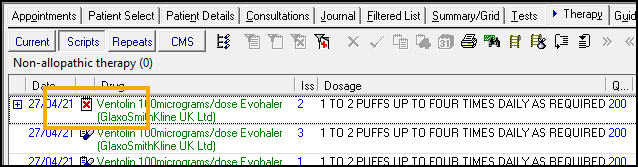
- Non-allopathic Medication- You can now record any non-allopathic medication your patient is taking. This then displays in the Non-allopathic therapy list available from the Therapy tab.See Recording Non-allopathic Medication for details.
-
Printing Out of Practice Prescriptions- Print
 is no longer enabled when you add an out of practice medication.
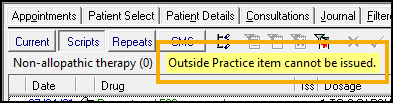
-
Updating an Out of Practice Medication- Once added, you can no longer:
-
Update an Out of Practice item to an In Practice item.
-
Update a Private prescription to an NHS prescription.
-
-
Similarly Named Drug Warning- If you select a medication that is commonly confused with another medication, based on the list of published by the MHRA in their Drug Safety Updates, a detailed warning now displays in the Drug Check Results screen, for example:
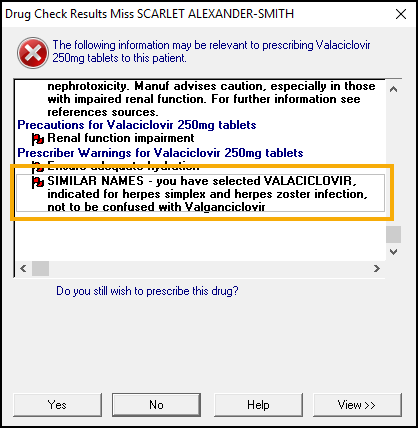
Select Yes to continue or No to change the medication you are prescribing.
Training Tip - Prescriber Warnings only display if you have a tick in Consultation Manager - Consultation - Options - Setup - Drug Check - Prescriber Warnings -
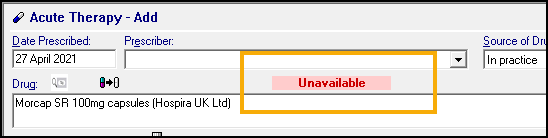
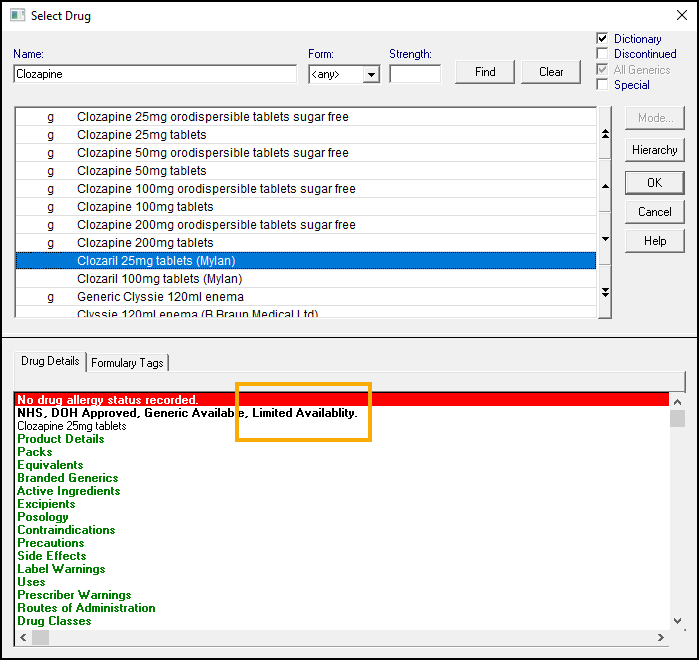
Medication Availability Restricted - If you select to prescribe an item that is highlighted as Availability Restricted within the DM+D, the following warnings display:
-
Therapy - Add - Limited Availability/Unavailable displays above the Drug details, hover over the warning to view further details where available:

-
Select Drug - Limited Availability displays in the information section of the screen:
-
-
Scotland Only
-
Default Prescriber - When a non prescribing member of staff adds, reauthorises or edits a medication, the Prescriber no longer automatically completes. The authorising prescriber must be selected each time.
Summary of Changes
Consultation Manager
Vision 3 release DLM 800 contains the following new features and improvements for Consultation Manager:
-
Medication - The following updates to prescribing medication are included in this release:
-
NHS Prescribing Price Information - In Scotland the NHS Prescribing Price Information is now country specific.
Training Tip - You can display NHS Prescribing Price Information from Pack Information and from Packs in the bottom half of the Select Drug screen.
 -
Switch to Generic - Any Quantity and Dosage instructions completed by default or manually entered on a medication, are now retained when you select Switch to Generic
 or Switch to Brand
  .
. -
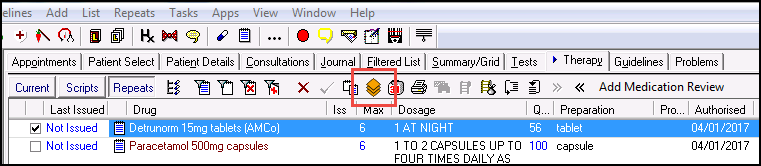
Maximum number of Repeats - You can now set a maximum number of issues that can be attributed to a Repeat Master. This can be set as a practice wide setting or a prescriber setting.
See Maximum Number of Repeats for details.
-
-
Immunisation - The issue of the Show all setting on the Immunisation - Add screen not working, has been addressed.
-
Alerts Pane - If you are using a Vision 3 view without a navigation pane, when you select Show Alerts
 they now display on the left hand side of your screen.
 -
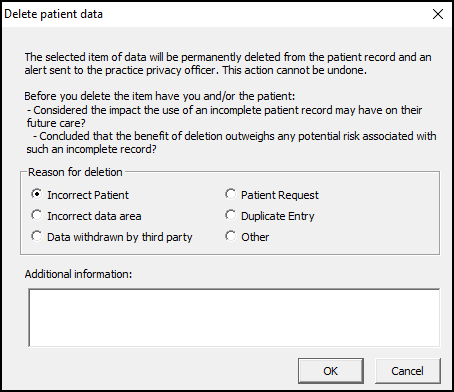
Deleting Clinical Data - You can no longer delete a Consultation with entries in it. To delete an entire consultation, each entry within it must be deleted individually before deleting the empty Consultation. If you select to delete clinical data, the Delete patient Data screen now displays prompting you to select a reason:
Where there is deleted clinical data, within a patient record, it now displays within the Alerts pane:
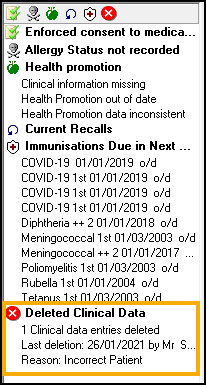 See Deleting Entries for details.
-
Patient Identification - The following identification types are now available to select from the Identification - Add screen in both Consultation Manager and Registration:
-
Biometric residence permit
-
Travel document
-
HC2 certificate
-
ARC card
-
Control Panel
Vision 3 release DLM 800 contains the following new features and improvements for Control Panel:
-
Appointments - If you have migrated to our fabulous new Appointments Setup app for the set up and maintenance of your Appointment books. Holidays, bank holidays, meetings and other adhoc events are now set up from the Appointment Events option in Control Panel.
-
Privacy Officer Group - To comply with Information Governance standards a Privacy Officer staff group is now available from Management Tools - Control Panel - File Maintenance - Staff Groups. This group must be populated with your designated Privacy Officer(s) as soon as possible.
To ensure appropriate governance of actions is maintained, your practice designated Privacy Officer(s) receives the following in Daybook or Tasks:
-
A task requiring action - A full alert:
-
When patient data is deleted.
-
When a transferred out patient record is accessed, more than 28 days after being deducted.
-
-
An announcement - A warning:
-
When a transferred out patient record is accessed less than 29 days after being deducted.
-
When a transferred out patient record is accessed as a result of running a report.
-
The Privacy Officer(s) must check announcements and tasks of this type to ensure the actions are valid and, where a task is raised, select Complete
 to confirm it has been checked.
 The information provided is:
-
Date and time of the action.
-
The staff member logged on.
-
The reason entered.
-
-
Show Deleted Records - Within Control Panel - Security - Vision Functions - Consultation Manager there is a new Show Deleted Records options, this defaults to System Managers. To permit additional staff to view deleted records, you need to add either the individual user or a group of users to the Vision Function.
-
Preferred Name - You can now add and maintain preferred names for staff members within Vision 3 if required. To add a preferred name:
-
From the Vision 3 front screen, select Management Tools - Control Panel - File Maintenance - Staff.
-
Highlight the staff member required, right click and select Edit Staff.
-
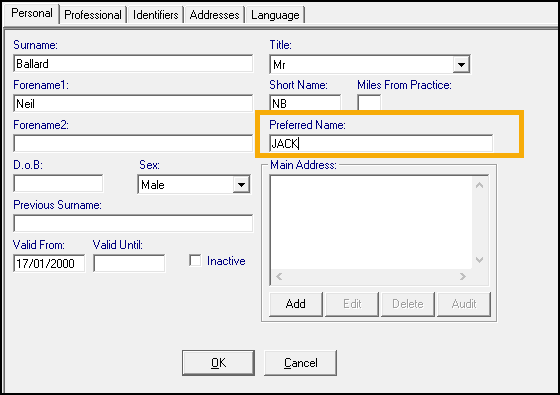
The Personal tab displays:
-
In Preferred Name enter the preferred name of your staff member.
-
Select OK to save.
-
Registration
Vision 3 release DLM 800 contains the following new features and improvements for Registration:
-
Registration Details - When you are adding a new patient and completing the Registration Details screens, you now have a Next option to guide you through the common screens:
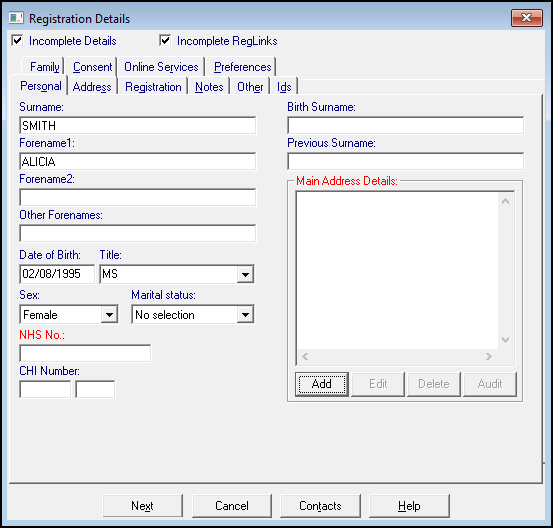
Once you get to the Preferences tab, OK displays.
-
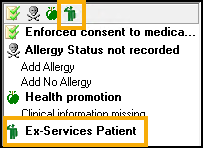
Ex-services Patients - Within the Preferences tab, there is now an Ex-services option. To record service details, select Ex-services and complete the History - Add screen as required, the clinical term defaults 13Ji.00 Military veteran:

If you update the clinical term, for example, Royal Navy veteran, you are given the option to enter the data in the Occupation Structured Data Area (SDA), select as required.
Select OK to save.
The selected term displays alongside the Ex-services option in the patient's Registration and displays in the Alert pane in the patient's clinical record:
-
Safe Key - You can now record Safe Key details from Registration. You can record this for existing patients as required and add it as part of your registration process for new patients. To record the Safe Key:
-
From within Vision 3Registration, select the patient and then select their Preferences tab.
Select Safe Key and the History - Add screen displays:
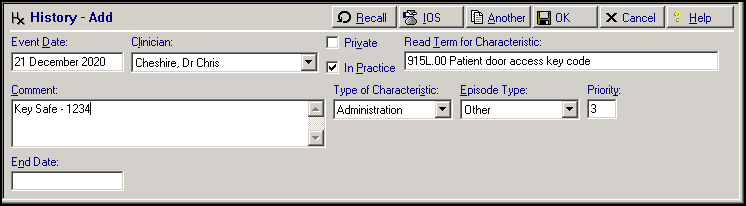
The clinical term defaults to 915L.00 Patient door access key code, enter the code(s) into Comment and then select OK to save.
-
-
Out of Area - You can now record that a patient, either new or existing, is residing outside of your catchment area. You can also now search for patients that are marked as Out of Area.
Other Updates
Vision 3 release DLM 800 also contains the following new features and improvements:
-
Event Log - You can now export Event Log files in CSV format. Simply create and run your search in the usual way and then select the new Export option:

The Save As screen displays, the default location is P:\Export\Exported Events, give your file a name and select Save. This file can now be opened, manipulated and shared as a normal CSV file.
Note - Patient names are not exported.
-
Registration Links - The issue of Upload transactions not processing during the Registration Links update in Mail Gateway has been addressed.
Summary of Changes
Vision 3 release DLM 790 contains the following new features and improvements:
England only
-
GP2GP Large Messaging - DLM 790 delivers GP2GP large messaging. This enables you to send and receive electronic patient records over 5mb and those containing over 100 attachments of any file extension. The way you process GP2GP messages does not change with the enabling of large messaging, the only visible change is the removal of the Journal tab in Mail Manager as it is no longer required. This functionality is currently switched off pending NHS Digital assurance and we will inform you when GP2GP large messaging is ready to be automatically switched on.
See GP2GP in England or GP2GP - Wales for details.
Wales only
-
2DRX - The issue with 2DRX barcodes not accounting for British Summertime (BST) and Greenwich Mean Time (GMT) has been addressed.
Summary of Changes
Vision 3 release DLM 780 contains the following new features and improvements:
-
Fast Healthcare Interoperability Resources (FHIR) - Vision3 is now ready to receive FHIR messages directly into Mail Manager and Daybook/Tasks.
Note - This functionality is currently disabled, full details will be provided in advance of switch on. -
Tasks - You can now view outstanding tasks from the Reminder on a patient record in Consultation Manager.
See Using Tasks from Consultation Manager for details.
Summary of Changes
Vision 3 release DLM 770 contains the following new features and improvements:
Prescribing PRN (as needed) Medication
- Prescribing PRN (as needed) medication - Prescribing acute or repeat medication with a dosage instruction of PRN (or equivalent) now prints/sends on a separate prescription.Important - The PRN option is disabled on receipt of Vision release DLM 770. This is to allow you to discuss the changes with the relevant clinicians/staff within your organisation. To use the new functionality and switch it on for all clinicians/staff see Therapy Settings for details.See Prescribing PRN (As Needed) Medication for details.
-
Reauthorising Medication - The option to select PRN is only available when adding new medication. To convert repeat medication into PRN items, highlight the repeat master, select Re-authorise and then tick PRN. The PRN repeat medication then prints on a separate prescription to other repeat items.
-
Printing PRN (as needed) drugs - Prescription Manager now includes additional PRN option.
See Printing/Sending Prescriptions with PRN Dosage Codes for details. -
Reorder form - Additional guidance instructions can now be included for PRN drugs. The additional guidance prints on the right hand reorder form and be be customised.
See Repeat Reorder Form for details. -
Therapy Settings - To accommodate the extra PRN options, practice-wide therapy settings are visible but cannot be updated from Consultation Manager - Options - Setup - Therapy. A new Vision System Settings option is available in Management Tools - Control Panel.
See Therapy Settings for details.
Important
PRN changes apply to the following electronic prescriptions:
-
England - Repeat Dispensing (RD) and Electronic Prescription Service (EPS)
-
Scotland - Acute Medication Service (AMS) and Chronic Medication Service (CMS Serial Prescribing)
-
Wales - 2-Dimensional Barcoded Prescriptions (2DRX)
GP Connect
-
Vision Appointments - GP Connect is an NHS Digital project designed to enable access to patient related information recorded on any of the participating systems across care settings. It relies on sharing agreements being signed between practices and authorised third parties. All data is exchanged via the National Spine. The ability to release appointments to third parties that you have a sharing agreement with, for example NHS111, relies on you using Vision Appointments and Vision Release DLM 760.
For more information see Appointments - GP Connect.
DLM 740, 750 and 760 are being combined and are now on general release as DLM 760.
Vision Release DLM 760 contains the following changes:
All Countries
Consultation Manager
- Test Results- The results for the following structured data areas (SDA's) have been updated to record up to 3 decimal points:
- Blood lipids
- Immunoglobulin
- Other Biochemistry Tests
- Other Lab Tests
- Urine Biochemistry
- New Seasonal Influenza Immunisations - New seasonal influenza vaccines have been added to the immunisation Structured Data Area (SDA):
Influenza aTIV (adjuvant)
Influenza aTIV (adjuvant) - OHP
Influenza aTIV (adjuvant) - Pha
Influenza QIVc (cell)
Influenza QIVc (cell) - OHP
Influenza QIVc (cell) - Pha
Influenza QIVe (egg)
Influenza QIVe (egg) - OHP
Influenza QIVe (egg) - Pha
Influenza TIV
Influenza TIV - OHP
Influenza TIV - Pha
Influenza TIV-HD (high-dose)
Influenza TIV-HD (high-dose) - OHP
Influenza TIV-HD (high-dose) - Pha
Patient Groups
- Sort Patients by Surname (Patient Groups) - The issue with Sort Patients by Surname not working has been addresed.
England
Control Panel
- Organisation codes (ODS) - From April 2020, new organisations in England have an ODS code in the format of ANANA (A is alphabetical, N is numeric). Vision Control Panel is updated to allow for this. See Organisation Codes.
Patient Facing Services
- Patient Facing Services Letter - The letter created when a patient registers for Patient Services, now includes a web address containing a list of all available paired suppliers of patient facing services
Search and Reports
- National Data Opt-out Service - The National Data Opt-out Service enables patients to choose not to share their confidential patient information for research and planning purposes. The opt-out filter should be applied when the organisation requesting the data, for example, a research body, confirms that they have approval from the Confidentiality Advisory Group (CAG) for the disclosure of confidential patient information. This approval is known as a 'section 251' and enables the common law duty of confidentiality to be lifted, so that confidential patient information can be disclosed without the data controller being in breach. It is only in these cases that opt-outs apply and the opt-out filter should be used.
DLM 760 introduces an Opt-out option for you to select from the Search: New search screen.
Scotland
Electronic Test Requesting
- Community Health Index (CHI) number - A patient's CHI number is now automatically included in the information passed to an electronic test requesting service when a test request is entered.
- Prescribing Number - A clinician's prescribing number is now automatically included in the information passed to an electronic test requesting service when a test request is entered.
Wales
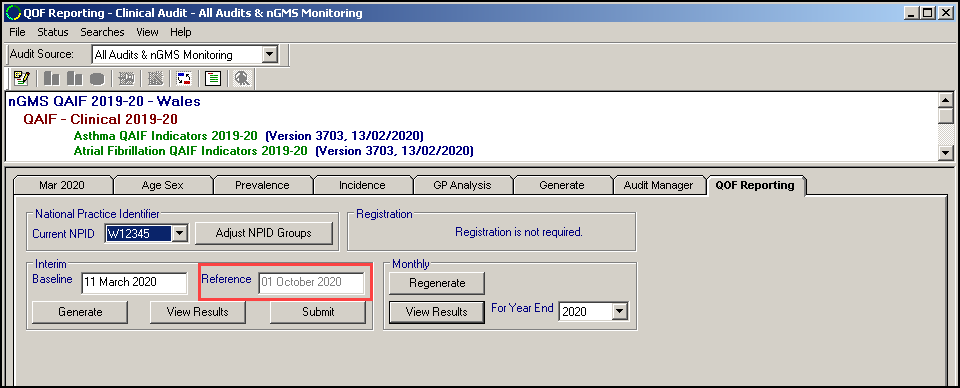
- QOF - In line with policy changes in Wales, the operational period for QOF has been updated to 1st October - 30th September.
- Clinical Audit - The Reference date now displays as 01 October.
Northern Ireland
Key Information Summary (KIS)
- Consent - A new Consent option is available, Lacks Capacity. If you select this option, Read term 9NdL.00 Lacks capacity to give consent (Mental Capacity Act 2005) is added to the patient record:
- Consent.png)
The following changes are included in the DLM 730 Vision release:
General
- DLM 730 incorporates the following DLM's:
- DLM 660, see DLM 660 (February 2019) for details.
- DLM 670, see DLM 670 (May 2019) for details.
- DLM 680, see DLM 680 (June 2019) for details.
- DLM 690, see DLM 690 (August 2019) for details.
- DLM 700, see DLM 700 (October 2019) for details.
- DLM 710, see DLM 710 (December 2019) for details.
- DLM 720, see DLM 720 (January 2020) for details.
Scotland
- HPV Screening - The Scottish Cervical Call Recall System (SCCRS) is now a primary screening test of HPV with additional Cytology if required. You will receive the following messages:
- Virology only result - No cytology information received.
- Cytology only result - Cytology and virology data received, but only the cytology is used for recall recommendation.
- Virology and Cytology result - Cytology and virology data received.
See Scottish Cervical Call Recall System (SCCRS) for details.
The following changes are included in the DLM 720 Vision release:
SNOMED CT
- Local Vision Codes - Some terms in the October 2019 SNOMED CT release do not map to existing Read codes. Vision have therefore created Vision Local Codes, based on the Read code format, to enable you to both record and report on these new codes within Vision 3, see Vision 3 Local Codes for the full list of terms.
Consultation Manager
- Consultation Type - The following Consultation Types have been added:
- Video consultation - Aimed at consultations carried out via video link, for example Skype or Face Time.
- eConsultation - Aimed at consultations carried out via electronic mediums, for example email or Whats App.
Control Panel
- Staff Roles - From Control Panel - File Maintenance, the following staff roles have been added for selection:
- Contact Tracing Nurse - The Contact Tracing Nurse role has the same functionality in Vision as a Practice Nurse.
- Paramedic - The Paramedic role can now be allocated to a staff member.
England and Wales only - The Paramedic prescribing code can now be added to enable prescribing for your paramedics.
The following changes are included in the DLM 710 Vision release:
Consultation Manager
- Test Results - The following SDA results screens have been updated to include a numeric Value:
- Faecal Occult Blood
- Serum Amino Acids
- Microscopy, Culture & Sensitivities
- Procedures, Specimens And Samples
- Film Report
- Iron Studies
- Haemoglobin Variants
- Microscopy For Malarial Parasites
- Haematology Screening Tests
- Sickle Cell Disease Screen
- Rubella Test
- Glandular Fever Test (Monospot)
- Chlamydia Test
- Chemical Function Tests
- Lipoprotein Electrophoresis
- Glucose Tolerance Test
- Blood Gases
- Biochemical Screening Tests
- Guthrie Test
- Schilling Test - B12 Absorption
- Disaccharidase Tolerance Test
- Pregnancy Test
- Cerebro-Spinal Fluid Examination
- Vomit Examination
- Synovial Fluid Examination
- Bone Marrow Examination
- Pleural Fluid Examination
- Sputum Examination
- Ascitic Fluid Examination
- Calculus Examination
- Amniotic Fluid Examination
- Mid-Stream Specimen Of Urine
- Histology
- Genetic Observations
- Other Diagnostic Imaging
Note - The numeric value is optional and only to be used where appropriate.
- Immunisations - The following immunisations have been updated:
Meningitis ACW & Y vaccination declined - Read code 657J500 now defaults to the Immunisation Consent SDA, any existing records with this code are automatically moved to the correct SDA as part of this install.
- BCG - The inappropriate age warnings that display when you record a BCG have been removed and the Reason now defaults to Special Risk Group.
- Co-ordinate My Care (where available) - You can now see if a patient has a care plan from the patient record in Consultation Manager:
 Patient has a CMC care plan, launch CMC to view and update the patient's plan - Displays if a plan exists, select to trigger the plan.
 This patient does not have a CMC care plan yet, launch CMC to create one - Displays if a plan exists, select to trigger a plan.
Note - The Coordinate My Care (CMC) initiative is retired from 27th July 2022.
Scotland only
Emergency Care Summary (ECS) and Key Information Summary (KIS)
The following changes have been made to the Emergency Care Summary (ECS) and Key Information Summary (KIS) functionality as part of this release:
- Special Note - The following changes are part of the DLM 710 update:
- When you add a Special Note to a patient, it is now added to the patient record as a Medical History entry with a Read code of 9bK5.00Special patient note. As part of this update, the most recent existing Special Note - Notepad record for each patient is automatically converted to the correct format. The original Notepad record is not deleted:

If the Special Note has an expiry date, a Recall is added to the patient record.
- When you add a Special Note to a patient, it is now added to the patient record as a Medical History entry with a Read code of 9bK5.00Special patient note. As part of this update, the most recent existing Special Note - Notepad record for each patient is automatically converted to the correct format. The original Notepad record is not deleted:
- DNRCPR - The Has DNACPR Form has been removed to avoid confusion. The following options are available:
Resuscitation status - For new records, select from
- 1R00.00 For attempted cardiopulmonary resuscitation, or
- 1R10.00 Not for attempted CPR (cardiopulmonary resuscitation).
Note - Existing entries for 1R0..00 For resuscitation and 1R1..00 Not for resuscitation, are still valid for ECS and included in the extract.- Remove tick - Records a Priority 1 Medical History entry, 1R00.00For attempted cardiopulmonary resuscitation, to the patient record.
- If this is an update on an existing record sent the same day, the following displays in Comment 'This record supersedes the Notepad record for DNACPR with the same date'
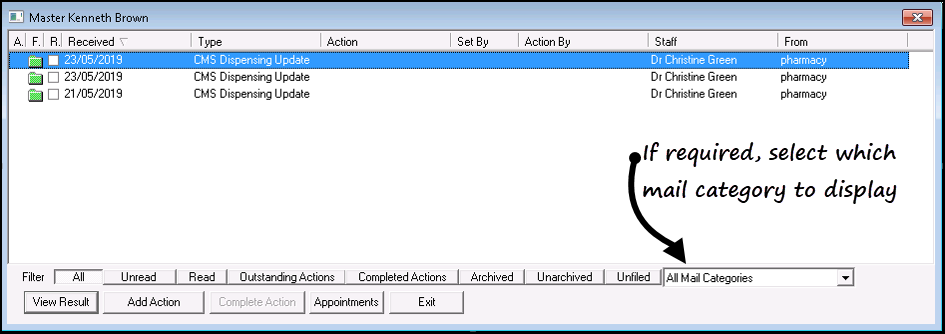
- View Mail for Patient - From View Mail for Patient
 there is a new mail category filter, this enables you to select the type of mail you want to see:
- Test Requesting - ICE, Technidata, tQuest and Cyberlab - If a Home Number is not recorded for a patient, the next recorded contact number is selected in the following order:
- Mobile number
- Secondary home number
- Emergency number
Where none of the above are recorded, no number is sent.
- Unit of Measure - A new unit of measure, ug Hb/g replaces ug/Hb/g stool.
Scotland
Serial Prescribing (previously known as CMS)
The following changes have been made to the Serial Prescribing functionality as part of this release:
- Deleting a Serial Prescribing dispensing event - You can now delete a dispensing event. Right click on the event, select Delete and confirm. The selected event is removed, the Last Issue Date and the Dispensing Event Count are updated.
- Editing the date of a Serial Prescribing dispensing event - If you have received the incorrect date for a dispensing event, you can now update it. Right click on the event, select Edit and update the date as required. Where appropriate the Last Issue Date is updated.
- Printing:
- Repeat Re-order form - Serial Prescribing items are now listed separately on the re-order form under a CMS Items heading.
- Preferred and Serial Prescribing Pharmacy names - Both the preferred pharmacy and the Serial Prescribing Pharmacy, as selected in Consultation Manager - Patient Details - Preferences, now print on the top of the right hand side re-order form.
-
Unique Prescription Number (UPN) - The UPN of a dispensing event now displays in a separate Message Reference column in Mail Manager.
To search on the UPN, from Mail Manager, select Filter - Message Reference and enter all or part of the UPN required:

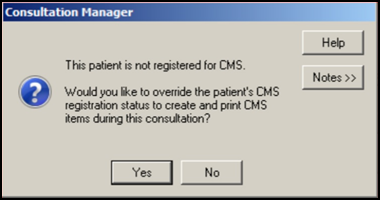
- Warning Message - If you attempt to create or print a Serial Prescribing item for a patient that has not registered for Serial Prescribing, the warning message has been updated to eliminate confusion:
The following changes are included in the DLM 690 Vision release:
- SNOMED CT - The issue with long SNOMED CT values has been addressed. The full value now displays in the Audit Trail within Consultation Manager.
Vision Release DLM 690 does not contain any other customer facing updates, but instead focuses on the infrastructure behind the scenes in order to improve existing functionality and provide a stable platform for all the exciting content currently being developed.
Vision Front Screen
-
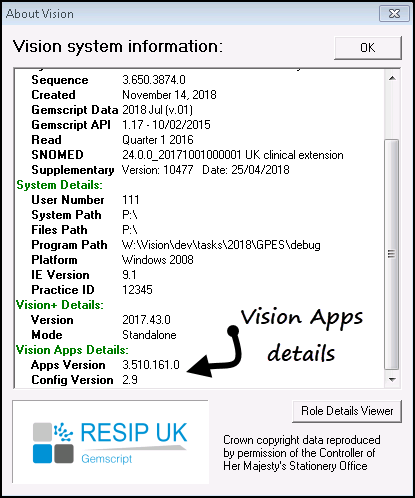
About Vision - The current Vision Apps configuration version installed on your Vision system now displays in the About Vision screen:
SNOMED CT
-
The Health Information Network (THIN) - The THIN extraction has been updated to add SNOMED CT to the extract.
England Only
-
Patient Services Registration Details Letter - www.coop.co.uk/myhealth has been added to the alternative Online Services section of the Registration letter.
Scotland
-
SCI Pathology - An issue with filing SCI Pathology results containing invalid namespaces has been addressed.
Vision Front Screen
-
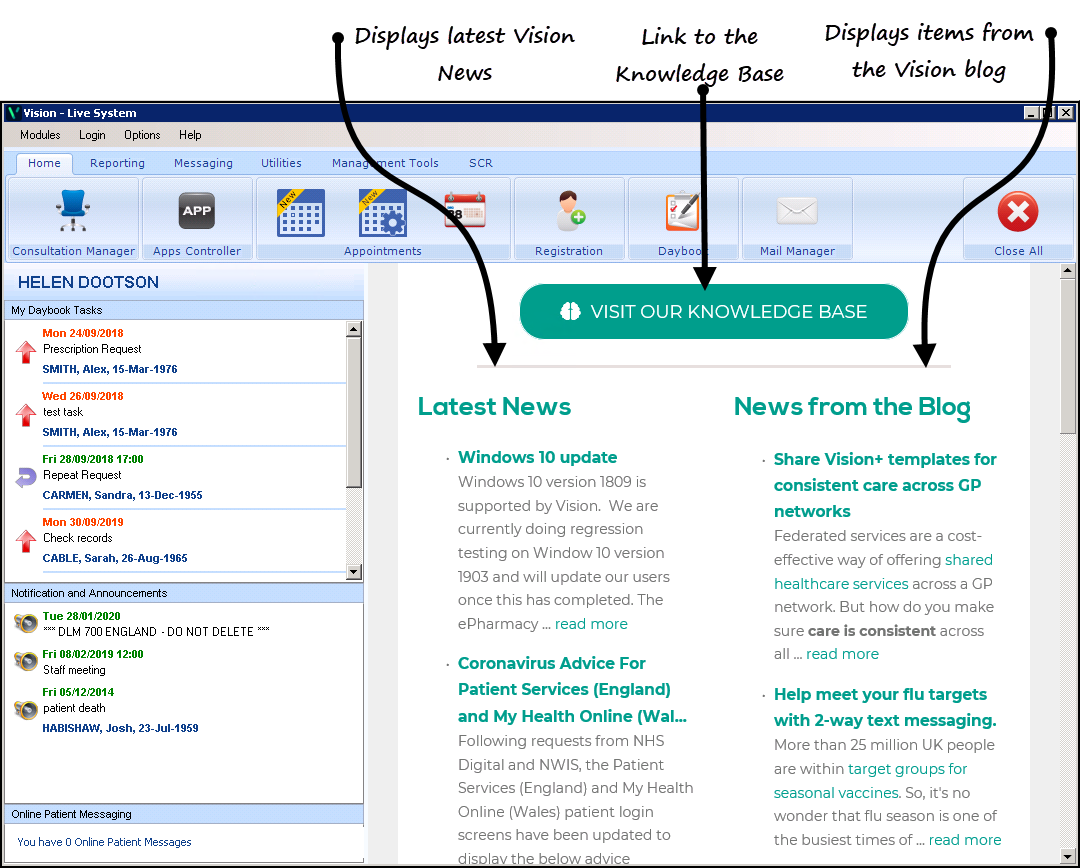
The Vision front screen has been updated with our new rebranded News from the Hive and News from the blog feeds:
Consultation Manager
-
Yellow Card - The occasional issue of missing drug names and medical history has been addressed.
Docman 10
- Docman 10 is a cloud based clinical correspondence solution provided by Advanced. From release DLM 660, Vision is ready to access documents stored in Docman 10. Details regarding your migration to and use of Docman 10 will be released in due course.
Mail Manager
- Federated Services - The message received by Mail Manager following a federated encounter, now contains details of the consultation filed to your patient's record. You can view the details, attach actions and print the message in the usual way. See Vision Anywhere for details.
- Text Colour - The issue of some text being difficult to read within the Message tab due to the grey background has been addressed, the background is now white.
England
- GPES Uplift - Vision Release DLM 660 includes the preparation work for GPES Uplift which is part of the GP Data Implementation Programme. This initiative supports GPs to receive payments for the services they provide or legally mandated data collections. The first Uplifted extract is planned for May 2019.
- GP Appointment Extract - NHS England requires the collection of appointment and utilisation data from all general practices. The GP Appointment Extract enables an overview of planned appointment capacity and how appointments are utilised.
Every Monday evening data is collected to show a forward look of planned appointments capacity within your practice for the next three months. There is an initial one off collection dating back to November 2017.
- Managed Server (AEROS) - The GP Appointment Extract is run and the resulting extract submitted automatically on a weekly basis.
- Local Server - You must add the GP Appointment Extract to your GPC Scheduler, see Setting up your GP Appointment Extract Schedule - England only for details.
See for GP Appointments Data Collection in Support of Winter Pressures further details
NHS App
- Most of the changes within DLM 650 are background changes preparing for Vision to be fully NHS app compliant, see https://digital.nhs.uk/services/nhs-app for further information.
General
- Inactive User Login - An issue identified, where an inactive user can log in to Vision, providing the log in screen user drop down box is disabled has been addressed
- Therapy Inactivation/Reauthorisation Reasons - Providing you have your therapy settings configured to select an inactivation/reactivation reason, it is now possible to select more than one reason for both:
- Therapy Inactivation - Up to five reasons, see Therapy Inactivation Reasons for details.
- Therapy Reauthorisation Changes - Up to four reasons as the first reason is always Reauthorisation, see Therapy Reauthorisation Change Reasons for details.
- Scotland only - Reauthorisation of CMS items - Up to three reasons as the first two are always Cancellation and Reauthorisation, see Therapy Reauthorisation Change Reasons for details.
Wales only
- WGP Portal - This is a new option that enables you to access your test request system from within Consultation Manager. See WGP Portal - Wales only for full details.
SNOMED CT
- Local Vision Codes - Help updated to latest release, see Vision Local Codes.
Scotland
- CMS - The following CMS actions now create and send a Cancellation Message:
- Inactivating a CMS master, via both CMS - Inactivate and Inactivate
 .
. - Reauthorising a CMS master with Keep original CMS item? ticked.
- Reauthorising a CMS master without Keep original CMS item? ticked, the cancellation is triggered the first time you issue from the new master.
- Deleting a CMS master.
- Inactivating a CMS master, via both CMS - Inactivate and Inactivate
- CMS - The issue of a reauthorised CMS not printing until the Medication term and Dispensing frequency is re-selected has been addressed.
SNOMED CT
- Clinical Practice Research Datalink (CPRD) - The CPRD extraction has been updated to be SNOMED CT compliant.
England
- GP2GP - Vision can now send and receive GP2GP records coded in both Read codes and SMOMED CT.
- eMed3 - The eMed3 extraction has been updated to be SNOMED compliant.
- SNOMED - There are various behind the scenes changes included in this release to facilitate the move over to the SNOMED dictionary, this includes the SNOMED dictionary for October 2017.
- Immunisations - Hepatitis B Junior (Pre-Aug 2017) has been renamed Hepatitis B Junior (Routine) to clarify reason for administration.
- Data validation by sex - To assist in managing the clinical data for transgender patients, validation based on sex has been removed from the following areas:
Registration title
Cytology
Contraception
Female Health Check form
Wales
-
 WCCG Referrals - An Accessible Information section has been added to WCCG Referrals. Any data recorded with the following Read codes is automatically updated and sent as part of the referral:
- 13o7. Preferred method of communication: written
13o8. Communication support finding
13Z.. Social/personal history NOS
2DH1. Does use hearing aid
9Nf0. Requires written information in large font
9Nf.. Patient information status
9Ngz. Further patient care statuses
9Nn.. Further interpreter needed
9NU.. Need for interpreter
- Immunisations - The new DTaP/IPV/Hib + Hep B (Diphtheria, Tetanus, Pertussis, Polio, Hib + Hep B) vaccination is now available from the drop down list in the Immunisation SDA. When selected, 6 individual immunisations are added to the patient record:
Diphtheria
Tetanus
Pertussis
Polio
HIB
Hepatitis B Junior
Deleting one of the individual records deletes all those recorded as part of the compound.
- All Test Entities - All test entities, where a value can be recorded, can now accept results containing up to six digits before the decimal point.
- Yellow Card - The following changes have been made as part of this release:
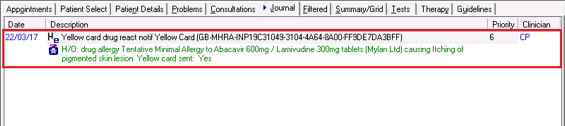
- Medical History recorded- When a Yellow Card entry is created and saved, a history entry with the Read code 9G4..11 Yellow card drug react notif is now posted to the patient record. This ensures the information is transferred as part of the GP2GP process.

- If NO, how bad was the suspected reaction? - By request of the Medicines and Healthcare products Regulatory Agency (MHRA) the If NO, how bad was the suspected reaction? selections have been removed and can no longer be selected from the Yellow Card screen.
- GP2GP - The units of measure for test results received via GP2GP have been reviewed and updated, this results in a better quality of data when records are received.
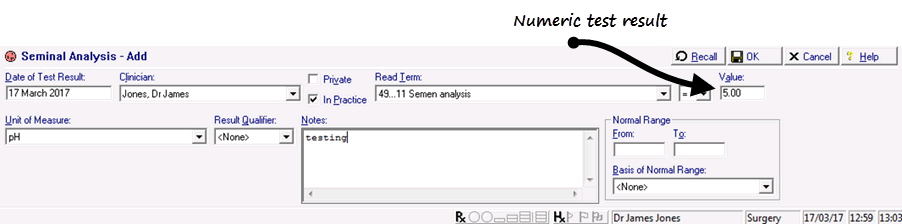
- Seminal Analysis SDA - The Seminal Analysis structured data area (SDA) now has a numerical value box allowing for more precise data entry and search capability.
- Examination of Faeces Structured Data Area (SDA) - You can now enter a test result value within the Examination of Faeces SDA. Any value entered is fully searchable.

Scotland
- Scottish Cervical Call Recall System (SCCRS) - The following changes have been made as part of this release:
SCCRS recall advice has been updated, Routine Recall is now labeled either:
- Routine Recall - 3 years, or
Routine Recall - 5 years
Read code descriptions have been updated:
4K23. Low Grade Dyskaryosis becomes 4K23. Mild Dyskaryosis
4K28. High Grade Dyskaryosis (Moderate) becomes 4K28. Moderate Dyskaryosis
4K24. High Grade Dyskaryosis (Severe) becomes 4K24. Severe Dyskaryosis
4K25. High Grade Dyskaryosis ? Invasive becomes 4K25. Severe Dyskaryosis/Invasive
Read codes have been added:
-
- 4K2J. Low Grade Dyskaryosis
- 4K2K. High Grade Dyskaryosis (Moderate)
- 4K2L. High Grade Dyskaryosis (Severe)
- 4K2M. High Grade Dyskaryosis ? Invasive
- SNOMED CT - Dual coding details added, see SNOMED CT for details.
- Batch Prescription icon - To address any confusion between options, the Batch Prescription icon has been updated to
 .
.
- Drug Levels SDA - The Drug Levels Structured Data Area (SDA) has replaced the Other Drug Level SDA, it incorporates a searchable Value option for result recording. All existing Other Drug Levels entries are converted to the new SDA as part of the DLM 520 install process. Results that have been previously recorded in Notes remain there.
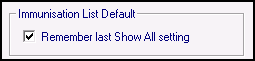
- Immunisation List Default - You can now select to save your setting in Show All on the Immunisation SDA. From Consultation Manager Setup - Data Entry, tick Immunisation List Default - Remember last Show All setting.
- Immunisation SDA - the following changes have been made to the Immunisation SDA:
- Historical immunisations have been removed from the active list
- The following immunisations have been added to the active list:
- Influenza - Seasonal OHP (Stages 1 - 4)
- Hepatitis B Junior (Stages 1 - 4)
- Rotavirus vaccination OHP (Stage 1 and 2)
- Influenza - Seasonal Intran'l Pharm (Single, Stage 1 and 2)
- Meningococcal ACWY Travel (<2y) (Stage 1 and 2)
- Hepatitis A (Vaqta Adult) (Stage B)
- Meningococcal B (Stage B)
- Meningococcal B OHP (Stage B)
- SDA Updates - The following SDA's have had their range of Read codes updated:
|
|
|
|
|
|
|
|
|
|
|
|
|
|
|
|
|
|
|
|
|
|
|
|
|
|
|
|
|
|
|
|
|
|
|
|
|
|
- Word Templates - Wherever you are selecting from the list of Word templates in Vision, you are now offered templates with both .doc and .docx extensions.
- Consultation Types - The issue of all Vision Consultation Types being offered has been addressed.
England
- Electronic Prescription Service (EPS) - Various changes have been made to the handling of Controlled drugs within EPS, see Electronic Prescription Services for full details.
- eReferrals - The single item size limit has been removed, so providing the total size of attachments does not exceed 5Mb individual items over 1Mb in size are now attached and sent.
England and Wales
- Language Spoken and Language Read within GP2GP - The issue of Language Spoken and Language Read not being imported correctly via GP2GP has been addressed.
Northern Ireland
- Northern Ireland Key Information Summary (NI KIS) - Your Vision system is now ready for the NI KIS facility to be switched on once training has been received, this will be organised by your Health Board once they are ready. See Key Information Summary (KIS) for full details.
-
 Units of Measure - The following units of measure have been added to the available list:
- Ratio (with the capital R) has been added to the available Units of Measure list.
- bp - Base Pair
- CU - Chemiluminescence units
- Kb - Kilobase
- cells/uL
- High
- Moderate
- Low
- Index
- Score
- SG units
-
Serum pro-brain natriuretic peptide level - The maximum Serum pro-brain natriuretic peptide level has been removed.
-
CHADS2 Score - The CHADS2 Score has been removed from the alerts pane within Consultation Manager as it is now included in Vision +, see Vision + Help - Calculator Tab.
Immunisations
-
Meningitis C - The Infant dose of Meningitis C vaccine that was scheduled for three months has been withdrawn, this immunisation has therefore been removed from the current list but is still available on the All list within the Immunisations SDA to enable accurate historical data recording.
-
 Yellow Card - Electronic Yellow Card reporting is now integrated in Vision and allows you to:
- Create a populated Yellow Card report directly from the current Drug Allergy and Intolerance - Add screen and when inactivating a repeat master where the reason is Allergy/intolerance. See Creating a Yellow Card Report.
- Send a completed Yellow Card report to the MHRA web service (England and Wales only see Pre-requisites). You can also preview and print the report.
- View existing Yellow Card reports created in Vision. See Editing an Existing Yellow Card Report.
- View automatically created Daybook tasks for saved unsent Yellow Card reports. See Daybook Tasks for Unsent Yellow Card Reports.
When the report is created, it is automatically populated with the information on the Allergy and Intolerance form along with specific patient and practice information where available.
-
Graphnet CCG Portal - If supported in your area, Graphnet is now available from the pick list in the Links tab, see Graphnet CCG Portal.
England only
-
Patient demographic ribbon - To enable you to quickly see the DCR consent status of a patient, the blue patient demographic ribbon has been updated to display:
- Patient can see this record if all the following conditions are met:
Control Panel - DCR enabled for practice.
Registration - DCR enabled within the selected patients Registrations Online Services tab.
Consultation Manager - The selected patient record contains Read codes 91B..00 Patient registration data verified and 9344000 Electronic record notes summary verified (in that order).
DCR Review App - Any category enabled.
- Patient May see this record displays - If any one of the above conditions are met.
- No message - If the DCR option in Control Panel - File Maintenance - Online is not selected.
General
- New Consultation Type - A new consultation type of Extended Hours is now available from the Type of Consultation list.
- Donor Details SDA - Read code 13V1.00 Not willing to be a donor is now available from the Donor Details SDA, to enable you to record a patients dissent. This Read code is also now available from Registration - Preferences - Donor details.
- New Units of Measure - the following units of measure have been added in this release:
- mg/mL
- copies/ml
- log10 IU/mL
Therapy
- Drug to Drug Interactions - To ensure major drug to drug interactions are not missed or their affects trivialised, the drug to drug interaction descriptions throughout Vision have been updated to:
- Severe from High
- Major from Medium
- Minor from Low
- Medication Review - The display issue has been addressed and medication reviews now display correctly on the patient record.
- Drug Check Contraindications - A Not Recommended category has been added.
- Reauthorise Repeat as Repeatable - The Reauthorise Repeat as Repeatable icon has been updated to
 . This prevents confusion with the Reauthorise Repeat icon.
Immunisations
- Immunisation Contraindication SDA - Read codes 8I2E.00 Pneumococcal vaccination contraindicated and 8I2F.00 Influenza vaccination contraindicated have been added to the Immunisation Contraindication structured data area (SDA). Any allergies previously recorded with these Read codes are updated to immunisation contraindications automatically on installation of this update.
- Allergies & Adverse Reactions SDA - Read codes in the 8I23% hierarchy have been removed from the Allergies & Adverse Reactions SDA. Any allergies previously recorded with these Read codes are updated to immunisation contraindications automatically on installation of this update.
- Therapy Issued Outside of the Practice - The options to select from and the methods of display have been improved for recording therapy prescribed outside of your practice.
- Repeat Inactivation Reason - A new option has been added to the Inactivation Reason screen, you can now select Dose Change as a reason for a repeat medication inactivation.
- Sigmoidoscopy SDA - The Read codes that file to the Sigmoidoscopy SDA have been expanded to include 68W20*- 68W25* and 68W2C* to support the changes to the Bowel Cancer Screening programme in England.
- Calcium Adjusted Level - Read code 4Q721 Calcium adjusted level now files correctly to the Adjusted Serum Calcium structured data area (SDA).
- Diabetes Management Plan and Vision App - Diabetic Management - The default Read code from Hb A1C - Diabetic Control has been updated to 42W5.00 Haemoglobin A1c level - IFCC standardised.
- Asthma Consultation - Read code 66Yp Asthma review using Royal College of Physicians three questions has been added to the available list to support the changes in the Business Rules from Wales for 2015/16.
- Identification - A new Identification option is available from the Consultation Manager - List menu, see Add Patient Verification Details.
- New Units of Measure:
- CU - Chemiluminescent Unit (CU) has been added to the unit of measure list for use with Read code 43ad.00 Tissue transglutaminase IgA level results received.
- ng/mLFEU - Nanograms per millilitre fibrinogen equivalent units (ng/mLFEU) has been added to the unit of measure list.
- Immunisations - A number of new and updated vaccinations are now available within the Immunisation SDA, see DLM 483 Release Guide - Immunisations.
- INPS Insurance Report - The INPS insurance report has been updated to include eMED3 records for the last three years
- Glomerular Filtration Rate (GFR) SDA - The list of Read codes that automatically file to the GFR SDA has been extended, see DLM 483 Release Guide - Glomerular Filtration Rate (GFR) SDA.
England
- Summary Care Record 2.1 - DLM 483 brings many important changes and enhancements to the way SCR works in Vision. See What's New in SCR
- Test Result Tooltips - If you opt to switch the option on, when you hover your mouse over a pathology result in the patient record view a Test Result Tool Tip is now displayed. See Test Result Tooltips.
Wales
- WCCG Messages - New message types have been added to the list of Welsh Clinical Communication Gateway (WCCG) messages you can process from Vision, see Additional Gateway Message Types.
Northern Ireland
- CCG Referral App - The way you access the CCG Referrals website has been updated, see Logging in to Your Gateway from Consultation Manager